
Posted by Angela_Petteys
Digital marketing thrives on data. No matter what type of site you have, whether it’s a large e-commerce site, a personal website, or a site for a small business, it’s essential to understand how people interact with your site. Google Analytics can provide a lot of the important insights you’re looking for, but when used alone, it does have its limitations. But by tagging your site and using Google Tag Manager in conjunction with Google Analytics, you’re able to collect much more data than you can otherwise.
Tags are snippets of code which are added to a site to collect information and send it to third parties. You can use tags for all sorts of purposes, including scroll tracking, monitoring form submissions, conducting surveys, generating heat maps, remarketing, or tracking how people arrive at your site. They’re also used to monitor specific events like file downloads, clicks on certain links, or items being removed from a shopping cart.
Sites commonly use several different tags and the amount of code needed to create them all can be pretty overwhelming, especially if you’re trying to add or edit tags by going directly into the site’s source code. Google Tag Manager is a tool with a user-friendly, web-based interface that simplifies the process of working with tags. With GTM, you’re able to add, edit, and disable tags without having to touch the source code.
While GTM is, obviously, a Google product, it’s hardly limited to just working with tags for other Google services like AdWords or Analytics. You can use it to manage many different third-party tags, including Twitter, Bing Ads, Crazy Egg, and Hotjar, just to name a few. If there’s another tag which doesn’t have a template in GTM, you can add your own custom code. There are only a few types of tags GTM doesn’t work well with.
The pros and cons of GTM
Lessens reliance on web devs
By far, the biggest benefit to Google Tag Manager is that it makes it easier for marketers to implement tags without having to rely on web developers to do it for them. Developers are usually busy with other high-priority projects, so tagging often ends up on the back burner. But since Google Tag Manager helps you avoid touching the source code, marketers can quickly add and make changes to tags on their own. This is a big advantage if, for example, you only need to use a tag to collect data for a very brief amount of time. Without GTM, there’s a good chance that it would take longer for the tag to be added than it would actually be live for.
Still requires some technical implementation
Although GTM helps reduce the reliance on developers, it doesn’t completely eliminate it. You’ll still need someone to add the container code to each page of your site. And while GTM has plenty of tag templates to choose from which are easy enough for a non-developer to work with, more complex customized tags will likely require the help of someone who really understands coding. If you have existing tags that were manually added to your site’s source code, those will need to be removed first so that you don’t end up with duplicate data.
Most businesses can benefit from using it
Businesses of any size can potentially benefit from GTM. Since GTM makes it so much easier to add and edit tags without a developer, it’s great for smaller businesses that might have limited access to technical support. And since sites for enterprise-level businesses can easily use dozens of tags, GTM makes it easier to manage them all and improves site speed by helping them load more efficiently.
Tags can slow down site speed if fired synchronously
One issue with traditional tracking tags is that if they fire synchronously, they can slow down site speeds. When tags fire synchronously, one tag being slow to load slows down all the other tags that are waiting on it. And the longer a site takes to load, the more likely it is that people will leave without converting. But tags created in GTM load asynchronously by default, meaning each tag can fire anytime it’s ready to. If you need to control the order in which your tags are fired, there is tag sequencing and firing priority functionality to let you do that.
Can be used for AMP sites and mobile apps, as well
You’re not even limited to just using GTM with standard websites. GTM can also be used to manage tags for AMP sites and mobile apps. In the case of mobile apps, GTM can be a huge help since it lets you add and edit your tags without having to issue an updated version of your app, which users might not be quick to actually download. In some respects, using GTM for AMP sites or mobile apps is pretty similar to using it for a regular website, but they do have their differences. In this guide, we’re going to focus on using GTM for web.
Components of tags & GTM
On the surface, tags and tag managers are pretty straightforward. But before you can start working with them, there are a few main concepts you’ll need to know about.
Containers
When you start working with GTM, the first thing you’ll need to do is create a container. A container essentially “holds” all the tags for your site.
After creating a new container, GTM gives you some code to add to your site. This is your container code and it will need to be added to the source code so it displays on each page of your site. Some CMSes, such as WordPress, have plugins to help add the container code for you, but you may need to contact your web developer to have it added. Once you’ve done that, you’ll be able to add, edit, disable, or remove your tags as needed through GTM.
Triggers
Each tag on a site needs to serve a specific purpose. Maybe you want to have a tag send information when someone downloads a file, when an outbound link is clicked, or when a form is submitted. These sorts of events are known as triggers and all tags need to have at least one trigger assigned to it; otherwise, it’s not going to do anything.
Triggers can be broken down into two main components: events and filters. When you go to configure a trigger in GTM, you’ll be given a long list of types of triggers to choose from. These are your events. Once you choose an event, you’ll be able to set up your filter.
Filters can be divided further down into three parts: variables, operators, and values. We’ll talk more about variables in just a minute, but in this case, it refers to the type of variable involved. The operator tells the tag whether an event needs to equal (or if it should be greater or less than a certain value, contain a certain value, etc.) And of course, the value is the condition which needs to be met. Even though the word “value” is typically used in reference to numbers and prices, remember that in this case, it doesn’t necessarily have to be a numerical value. In many cases, your value will be something like a URL or a keyword.
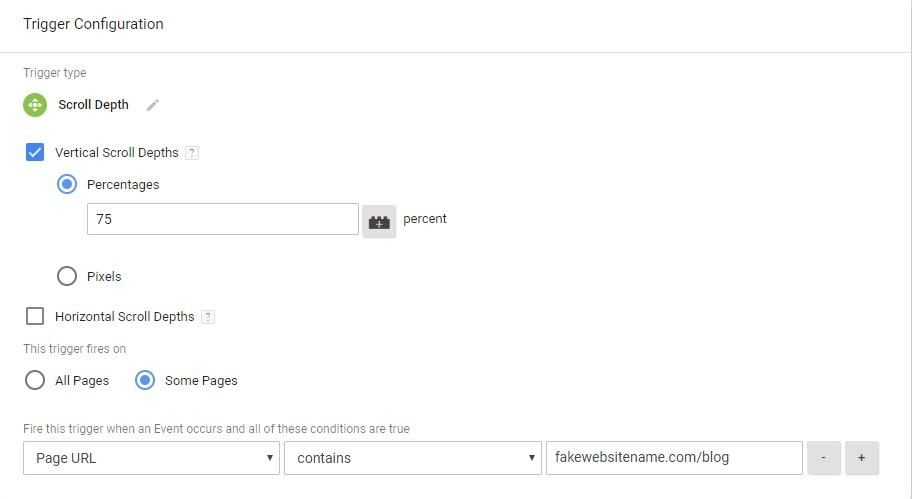
For example, let’s say I wanted to see how many people were reading the blog content on my site in depth. I could create a tag with a Scroll Depth event trigger that should fire when the vertical scroll depth reaches 75%. If I wanted this to fire on every page of my site, I could leave the “All Pages” option selected in the trigger configuration box and I wouldn’t have to create any further filters. But since I’m focusing on blog content, I’d choose “Some Pages” and create the filter “Page URL” “Contains” “fakewebsitename.com/blog.”
There might also be some circumstances when you don’t want a tag to fire. In this case, you can create a blocking trigger to prevent it from firing on those occasions. GTM prioritizes blocking triggers over other types of triggers, so if you have a blocking trigger that contradicts a condition set by another trigger, Google Tag Manager will follow what’s specified by the blocking trigger. For instance, if you have a tag that’s set to fire on all of your pages, but there are a few pages you’d like to have excluded from that, you can just use a blocking trigger to prevent it from firing on those few pages.
Variables & constants
While tags depend on triggers, triggers depend on variables. Variables contain the value a trigger needs to evaluate to know whether or not it should fire. The tag compares the value of the variable to the value defined in the trigger and if the variable meets the conditions of the trigger, the tag will fire.
Tags also use variables to collect information that can be passed onto the data layer as a user interacts with the site. A common example of this would be if a tag was set to fire when a person adds a certain amount of products to their shopping cart.
Variables can often be reused between tags. One of the most popular tips for using GTM is to create constant variables with the ID numbers or tracking codes you’ll need to use more than once. For example, if you’ll need to use your Google Analytics property ID number in multiple tags, you could just create a constant string variable with the value being your ID number. That way, instead of repeatedly having to look up and enter your ID number, you could just select the variable name.
When using GTM, you’ll be working with two different types of variables: built-in variables and user-defined variables. Built-in variables are some of the most commonly used types of variables, so Google went ahead and made them easy to access in GTM.
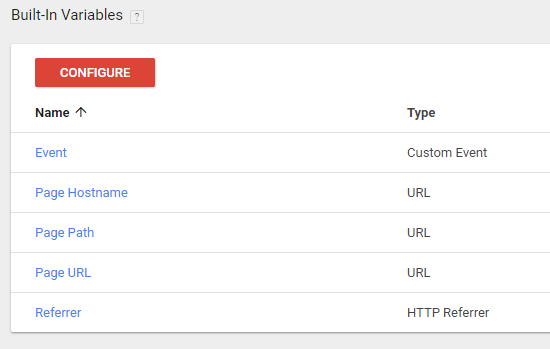
Once you select a built-in variable, you’ll be able to configure its settings however you’d like. Note that these are just a few of the built-in variables for regular web containers. You can find more built-in variables by clicking the “Configure” button. If you’re using GTM for AMP sites or mobile apps, you may see different options to choose from.
If you need another type of variable that’s not included as a built-in variable, you can create a user-defined variable. When you go to add a user-defined variable, you’ll be given a list of types of variables to choose from. For more information on each type of variables, Simo Ahava has a very helpful guide to different variable types.
Variables can be created from the GTM dashboard by clicking on the “Variable” option on the left side menu. You can also create them while you’re creating a tag by clicking on the button next to the field that looks like a Lego block with a plus sign on it.
Data layers
Tags need information to know whether or not they should fire, but how (or where) do they get that information? One way they could find it is by checking the page’s HTML structure, but that’s really not an ideal solution. When tags need to search through HTML to find what they’re looking for, it can take longer for them to fire. And if the site’s HTML structure changes over time, tags can break. Besides, there are certain types of information a tag might need which won’t be found in a page’s HTML, like a transaction total.
A data layer is a JavaScript object which keeps the information tags need separate from the rest of your site’s code. Since tags don’t have to spend time searching through the HTML to find the information they need, this is another way GTM can help improve site speed. Instead, everything they’re looking for can be found in one place and it’s readily available when the page loads.
Technically, data layers are optional. You don’t have to specifically define one yourself; GTM can initiate one for you. But if you want to use GTM to track specific events, you’ll need to have a data layer.
To start off with, a new data layer object will look like this:

When adding a data layer, the object needs to be placed before the GTM container code. If the data layer object is placed after the container code, GTM won’t be able to access the information in it and the data layer will basically reset after loading.
Once the data layer object has been added to a page’s code, the brackets in the second line can be populated with information, variables, and events. Some types of information can be written directly into the data layer, but other types of information can be pushed into the data layer dynamically as a user interacts with your site, such as if someone downloads a file or if they add a certain amount of products to their shopping cart.
Working with GTM
Creating accounts and containers
To get started, go to tagmanager.google.com and create an account. Under “Setup Account,” enter the name of the company whose site is being managed and hit “Continue.”

Next, you’ll set up your container. Enter your domain name as the container name, choose which type of page or app it will be used on, and click “Create.” If you choose iOS or Android, you’ll also have to specify whether you’re using Firebase SDK or a legacy SDK.
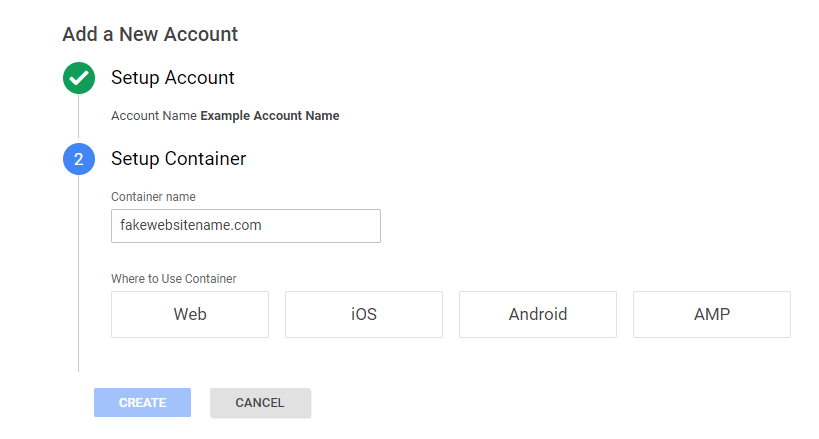
Note that I specifically said to use the company name as the account name and the site’s domain for the container name. In theory, you can name these anything you want. This is just how Google recommends naming them as a best practice. Generally speaking, one of the best things you can do when working with GTM is make sure everything is named very clearly. Otherwise, it’s very easy for mistakes to be made.
Multiple GTM accounts can be managed within a single GTM account, but Google advises creating one container per domain. You don’t have to create separate containers for each individual tag or for every individual page on a site; all tags can all be placed within one container.
For most companies and organizations, one container is all they’ll need. But in the case of a company that has subsidiaries or owns separate businesses, the website for each subsidiary/business should get its own container and all the containers can be managed from one main GTM account. If a site has a subdomain that is treated separately from the main domain, the subdomain should also be given its own container.
When a marketing agency is managing tags on behalf of a company, Google recommends that the company create their own GTM account, then add the agency’s Google account as a user. This way, the agency can access GTM, but it’s easy for the company to revoke access should they decide to change agencies.
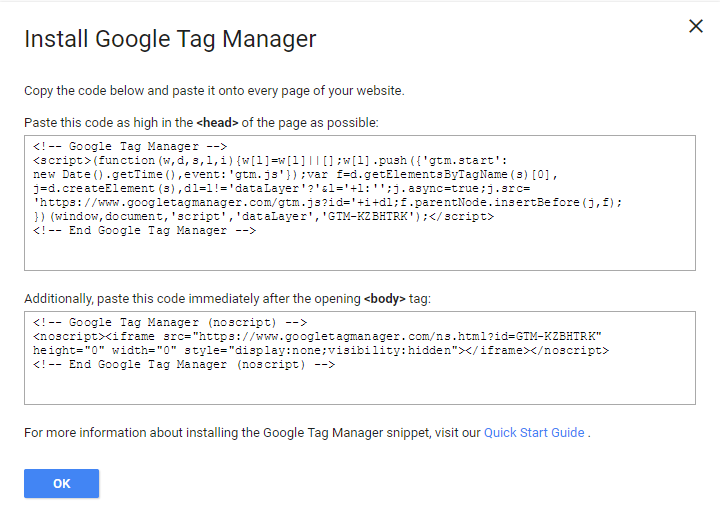
After creating your container, accept the GTM terms of service and you’ll be given your container code.
Once the container code has been added, you’re able to start creating tags. But before you get started, it’s a good idea to take some time to figure out exactly which tags you want to add. Even though there aren’t any limits to the amount of tags you can put in a container, for best performance, Google advises keeping the amount of tags you use to a minimum. If you’re migrating your tags to GTM from another tag manager or are making the switch from tags coded in your source code, this is a good time to review the tags currently on your site. In many cases, sites have tags that are associated with services they’re no longer using or were used to track things that aren’t being monitored anymore, so this is a good opportunity to “clean house,” so to speak.
Creating a tag
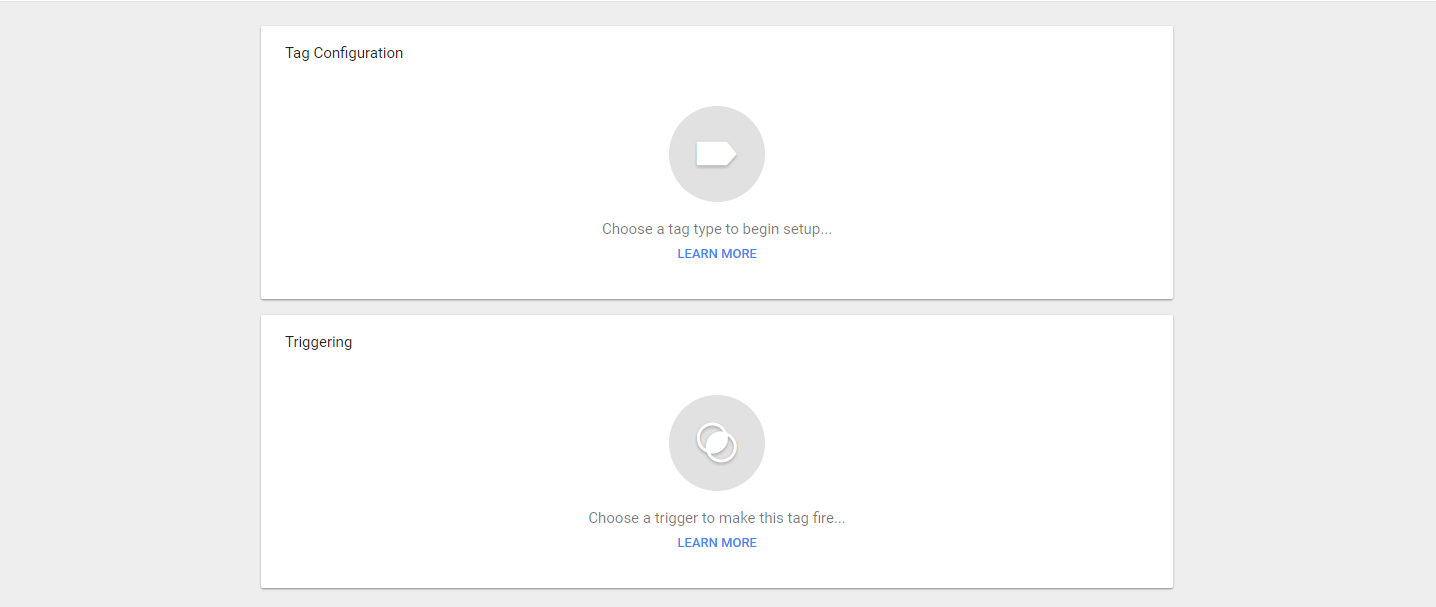
When you create or select a container, the first thing you’ll see is the GTM dashboard. We’ll eventually get around to talking about almost everything you see here, but let’s begin by creating a tag. Click “Add a New Tag” to open up a window where you’ll be able to name and configure your tag.
Before we go any further into the process of creating tags, remember to name your tags very clearly. Since sites often use several different tags, you won’t want there to be any confusion about which tag does what. Google’s recommended tag naming convention is: Tag Type – Detail – Location. For example, a Google Analytics tag that tracks form submissions on a Contact Us page would be named “GA – Form Submission – Contact Us.” Including the location of a tag in its name is a good idea because it helps distinguish it from similar tags on other pages. So if I had other GA form submission tags on my site, specifying that this one is on the Contact Us page would help me avoid editing the wrong one by mistake.
Putting the tag type at the beginning of a tag name also helps keep your tags organized. GTM lists tags alphabetically, so if you’re creating multiple tags for the same service or tool, all of those tags will all be grouped together and easy to find.
Now, back to creating a tag. When you click “Add a new tag” on the dashboard, this is the window you’ll see. Choose “Tag Configuration” and you’ll be given a long list of tag templates, which includes many of the most commonly used types of tags. If any of these are what you’re looking for, click on it and enter the information requested. If you don’t see the type of tag you want to create listed, choose “Custom HTML” to add your own code.
Since the exact information you’ll need to provide will vary depending on which type of tag you’re working with, I can’t possibly go into how to make every single type of tag. But as an example, let’s say I wanted to notify Google Analytics anytime someone views my pricing page. After choosing Universal Analytics, this is what I’d see:
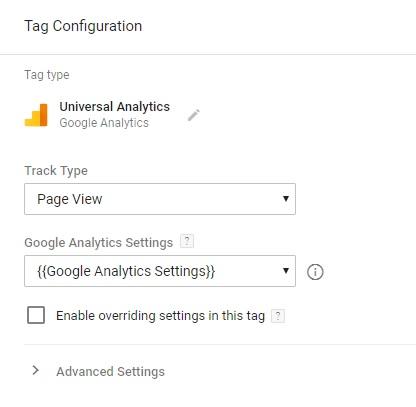
All I would need to do is choose “Page View” from the “Track Type” dropdown menu, then enter the variable with my Google Analytics account information. If I hadn’t created that variable ahead of time, I could make one now by clicking the dropdown menu under “Google Analytics Settings” and choosing “New Variable.”
If I wanted to make changes to the tag firing sequence or create a firing schedule, I could do that by clicking on the “Advanced Settings” option. Click outside the tag configuration window to go back to the previous screen.
Next, you’ll need to create at least one trigger. Click the “Triggering” box underneath “Tag Configuration” to get started. If you don’t have a previously created trigger to choose from in the list that opens up, click the + sign in the upper right corner of the window. This will bring up a new window where you’ll be asked to name your new trigger. Do that and click on the “Tag Configuration” box so see a list of trigger types. In my case, I’d choose “Page View.”
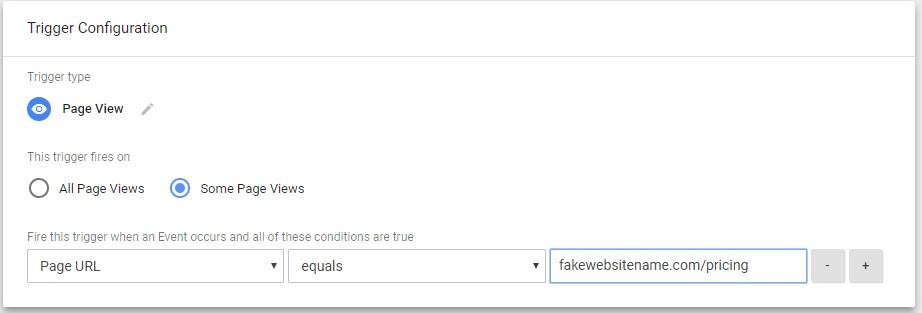
Since I only want my tag to fire on one page, I’d choose “Some Page Views,” then create a filter specifying that the page URL needs to equal the URL of my pricing page. If I had another filter to add, I could click the plus (+) button next to the filter to set one up. If I had created multiple filters for this tag and later decided to get rid of one of them, all I’d have to do is hit the subtract (–) button next to the filter in question. When you’re done, click outside the window to exit.
Once your tag and trigger have been configured, save it and you can either keep working by creating more tags or you can preview your tag and make sure it’s working correctly before publishing it.
Previewing, debugging, and publishing tags
GTM’s “Preview & Debug” mode lets you test tags before publication so that you can make sure everything is working correctly and that you won’t have any errors throwing off your data.
To enter “Preview & Debug,” click the “Preview” button in the upper right corner of the GTM dashboard and you’ll see an orange banner notifying you that you are now in “Preview” mode. Next, open the site you’re tagging. If you already have your site open in another tab, refresh the page and you should see a “Debug” panel at the bottom of your screen. (Don’t worry, visitors to your site won’t be able to see it.)
The “Debug” panel shows all sorts of detailed information about your tags, triggers, and data layer. On the left side of the panel is an event timeline summary, which outlines all the events that occur in the data layer. At a minimum, you should be seeing at least three events listed here: Page View, DOM Ready, and Window Loaded. It’s OK to see more than three events, but if any of those three are missing, there’s a problem that needs to be fixed.
When you click on any of the events in your timeline, you’ll see all the tags which are set to fire when that event occurs. Click on any of the tags to see more detailed information about its triggers, properties, and if there are any blocking triggers associated with it.
As you work in “Preview & Debug” mode, you’re the only one who can see the information about your tags. But let’s say you’re working as part of a team on a tagging project and you find an issue you want to bring to another person’s attention. There is a way to do that. Switch back over to your GTM dashboard and look at the orange banner. On the right, there’s a “Share Preview” button. Click on it and you’ll bring up a box where you can enter the URL of the page in question. This will generate a preview link you can use to send to another person.
If you’re having a hard time getting “Preview & Debug” to work correctly, Analytics Mania has a great guide to solving some of the most common reasons why this happens.
Even after a tag has been published, Google still makes it easy to go back and check to make sure there aren’t any problems. Google Tag Assistant is a free Chrome extension and once it’s installed, you can visit any page on your site and it will tell you if your tags are firing correctly or if there are any improvements that could be made. GTA uses a three color system to indicate its findings: green, blue, and red. Green means all of your tags are working, blue means GTA has suggestions for how a tag could be improved, and red means it’s not working.
Once it appears that all of your tags are firing correctly, you can go ahead and publish them. From the GTM dashboard, hit the “Submit” button in the upper right corner and you’ll be asked to review your changes. If everything looks OK, enter a name and description for your new container version and publish it.
When you publish changes in GTM, it creates a new version of your container. If there’s ever a problem and you have to revert to an earlier version of your container, all you have to do is click the “Versions” button at the top of the GTM dashboard, choose the version you’d like to revert to from the list, click “Action,” then “Publish.”
If you’re migrating your tags from another tag manager or from hard-coded tags on your site, Google advises setting up all of your tags in GTM, then removing your old tags all at once and publishing the GTM container with your new tags as quickly as possible. You might have a very small gap in your data collection, but there shouldn’t be any more issues after your new tags are live.
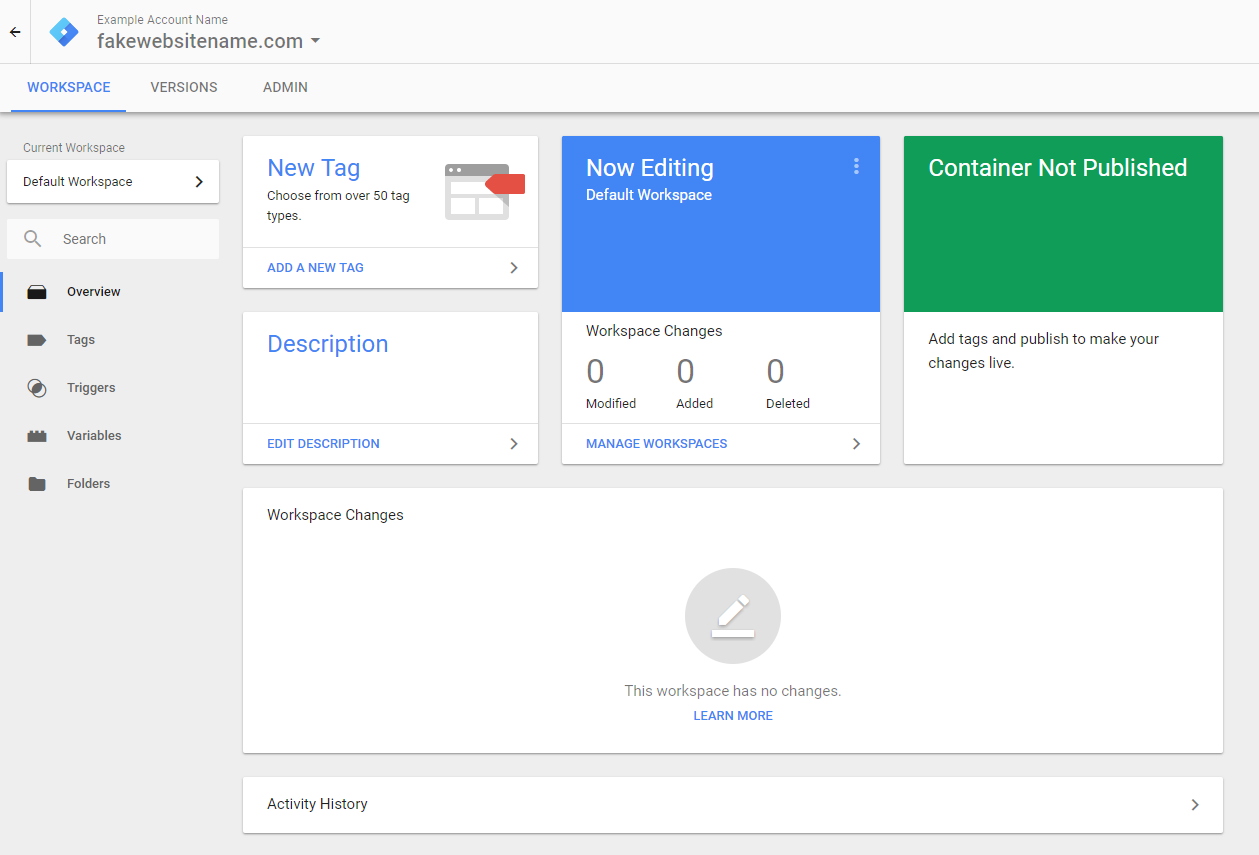
Workspaces, workspace changes, and activity history
If you have multiple people working on a tagging project at the same time, workspaces can help make life a little easier. Even if you’re not collaborating with others, sometimes having the option to create separate workspaces can still be very helpful.
In older versions of GTM, all edits had to be made in a common container draft. If one person or team finished adding tags before another person/team, they couldn’t publish their new tags without also publishing the other team’s tags-in-progress. But with workspaces, multiple users can work on tagging at the same time without interfering with each other’s work.
Each workspace uses the current published container version as a basis, but tags in each workspace can be edited, previewed, debugged, and even published independently from the tags in other workspaces. If you’re working with the free version of GTM, you can have up to three different workspaces, one default workspace and two others, but if you use Google Tag Manager 360, you can create an unlimited amount of workspaces.
When one workspace is published, it creates a new version of the container. If there are any other workspaces with unpublished changes saved in them, the user(s) working in those spaces will see a notice saying that they need to update the workspace. Updating the workspace syncs the changes in the container to their workspace. While it’s not required to do so to continue working, it’s generally best to stay on top of updates so that you’re not working with an outdated version of the container.
After syncing changes in a workspace, you’ll be notified if there are any conflicts which need to be resolved. If any conflicts exist, you’ll be asked to review them and either ignore the conflict or copy the change. When you copy the change, the field in question in your workspace will be overwritten with the information from the latest container version.
If necessary, you can set user permissions on workspaces to prevent users from making unwanted changes. For example, if you had a developer working on some really complicated custom tags, the developer might want to create a separate workspace to work in and limit the user permissions so that only they can make changes to it. This way, marketers will be able to go in and make changes without accidentally making changes to the custom tags.
Another great thing about GTM, particularly if you have more than one person working on tagging, is that it lets you see which changes were made, when they were made, and who made them. On the dashboard, you’ll see a Workspace Changes section, which outlines some of the most recent changes that have been made to tags and triggers. If mistakes any mistakes have been made, you can use the “Abandon Change” option to delete those changes. Beneath Workspace Changes, there’s Activity History, which shows all activity on a GTM account.
Additional resources
Google Tag Manager has a lot to offer, but learning how to use it in depth can be pretty overwhelming. This guide helped introduce you to the tool, but there’s still a lot more to learn if you want to use GTM to its full potential. LunaMetrics and Simo Ahava have written about GTM very extensively, so they’re excellent places to start if you have any questions or want to learn more. Of course, Google also has a lot of helpful information. Even if you’re not a developer, Google’s Tag Manager Guide for Developers is worth taking a look at since it does a great job of explaining some of the concepts related to GTM and has a lot of good information about how to use it. With all these resources, you should have all the information you need to get the most out of GTM.
Sign up for The Moz Top 10, a semimonthly mailer updating you on the top ten hottest pieces of SEO news, tips, and rad links uncovered by the Moz team. Think of it as your exclusive digest of stuff you don’t have time to hunt down but want to read!
![]()