Posted by alexis-sanders
Schema.org is cryptic. Or at least that’s what I had always thought. To me, it was a confusing source of information: missing the examples I needed, not explaining which item properties search engines require, and overall making the process of implementing structured data a daunting task. However, once I got past Schema.org’s intimidating shell, I found an incredibly useful and empowering tool. Once you know how to leverage it, Schema.org is an indispensable tool within your SEO toolbox.
A structured data toolbox
The first part of any journey is finding the map. In terms of structured data, there are a few different guiding resources:
- The most prominent and useful are Google’s Structured Data Features Guides. These guides are organized by the different structured data markups Google is explicitly using. Useful examples are provided with required item properties.
Tip: If any of the item types listed in the feature guides are relevant to your site, ensure that you’re annotating these elements.
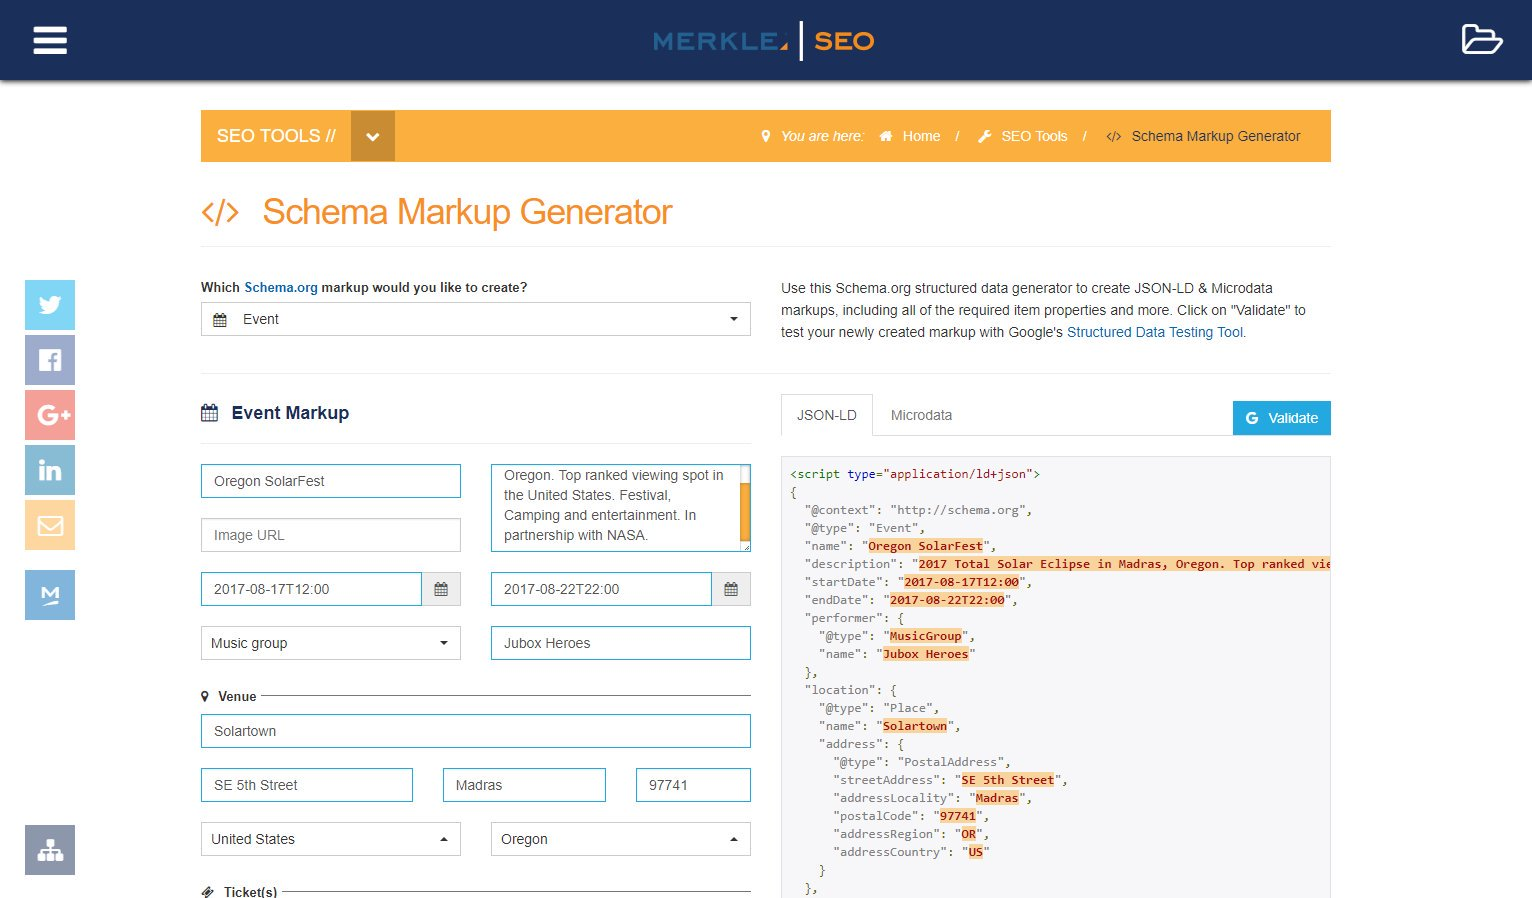
- I also want to share Merkle’s new, free, supercalifragilisticexpialidocious Structured Data Markup Generator. It contains Google’s top markups with an incredibly user-friendly experience and all of the top item properties. This tool is a great support for starting your markups, and it’s great for individuals looking to reverse-engineer markups. It offers JSON-LD and some illustrative microdata markups. You can also send the generated markups directly to Google’s structured data testing tool.
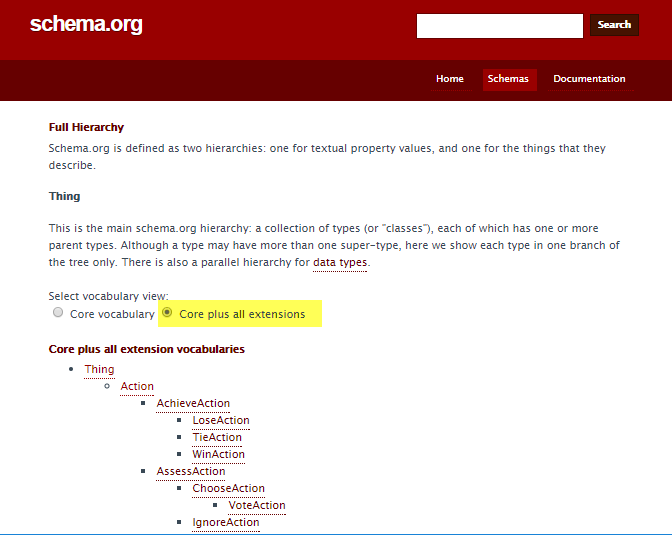
- If you’re looking to go beyond Google’s recommendations and structure more data, check out Schema.org’s Full Hierarchy. This is a full list of all Schema.org’s core and extended vocabulary (i.e., a list of all item types). This page is very useful to determine additional opportunities for markup that may align with your structured data strategy.
Tip: Click “Core plus all extensions” to see extended Schema.org’s libraries and what’s in the pipeline.
- Last but not least is Google’s Structured Data Testing Tool. It is vital to check every markup with GSDTT for two reasons:
- To avoid silly syntactic mistakes (don’t let commas be your worst enemy — there are way better enemies out there ☺).
- Ensure all required item properties are included
As an example, I’m going to walk through the Aquarium item type Schema.org markup. For illustrative purposes, I’m going to stick with JSON-LD moving forward; however, if there are any microdata questions, please reach out in the comments.
Basic structure of all Schema.org pages
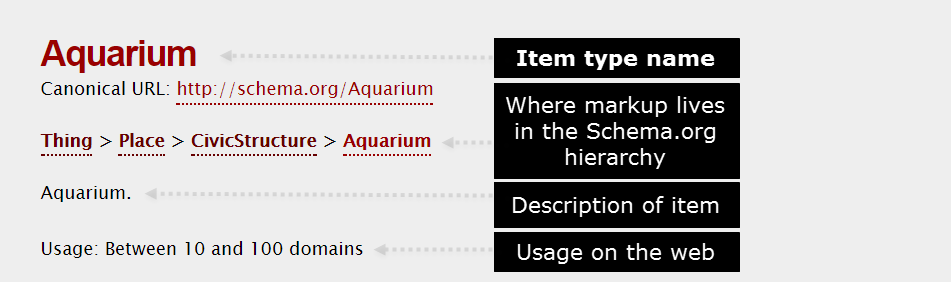
When you first enter a Schema.org item type’s page, notice that every page has the same layout, starting with the item type name, the canonical reference URL (currently the HTTP version*), where the markup lives within the Schema.org hierarchy, and that item type’s usage on the web.
*Leveraging the HTTPS version of a Schema.org markup is acceptable
What is an item type?
An item type is a piece of Schema.org’s vocabulary of data used to annotate and structure elements on a web page. You can think about it as what you’re marking up.
At the highest level of most Schema.org item types is Thing (alternatively, we’d be looking at DataType). This intuitively makes sense because almost everything is, at its highest level of abstraction, a Thing. The item type Thing has multiple children, all of which assume Thing’s properties in a cascading in a hierarchical fashion (i.e., a Product is a Thing, both can have names, descriptions, and images).
Explore Schema.org’s item types here with the various visualizations:
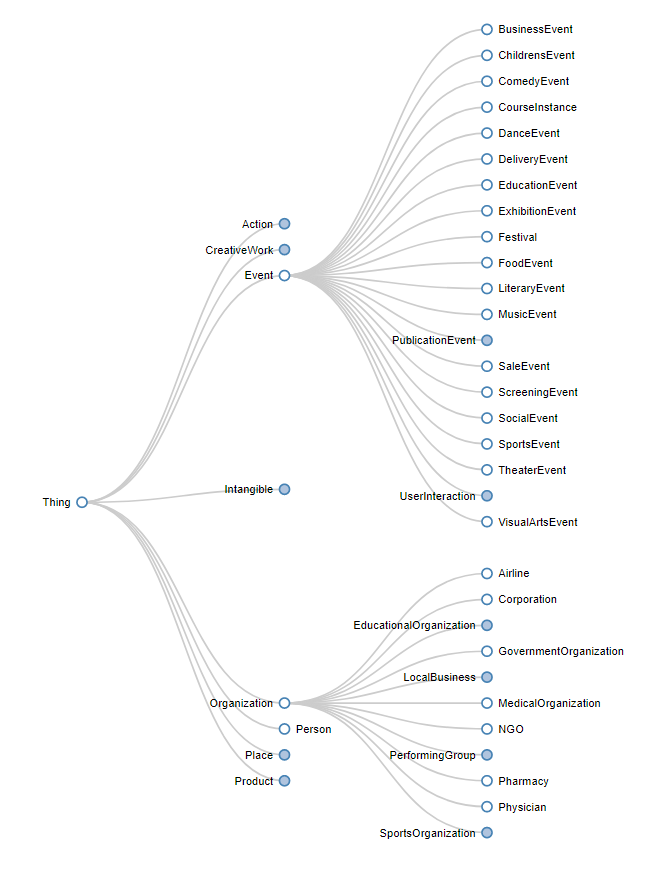
https://technicalseo.com/seo-tools/schema-markup-generator/visual/
Item types are going to be the first attribute in your markup and will look a little like this (remember this for a little later):

Tip: Every Schema.org item type can be found by typing its name after Schema.org, i.e. http://schema.org/Aquarium (note that case is important).
Below, this is where things start to get fun — the properties, expected type, and description of each property.
What are item properties?
Item properties are attributes, which describe item types (i.e., it’s a property of the item). All item properties are inherited from the parent item type. The value of the property can be a word, URL, or number.
What is the “Expected Type”?
For every item type, there is a column the defines the expected item type of each item property. This is a signal which tells us whether or not nesting will be involved. If the expected property is a data type (i.e., text, number, etc.) you will not have to do anything; otherwise get ready for some good, old-fashioned nesting.
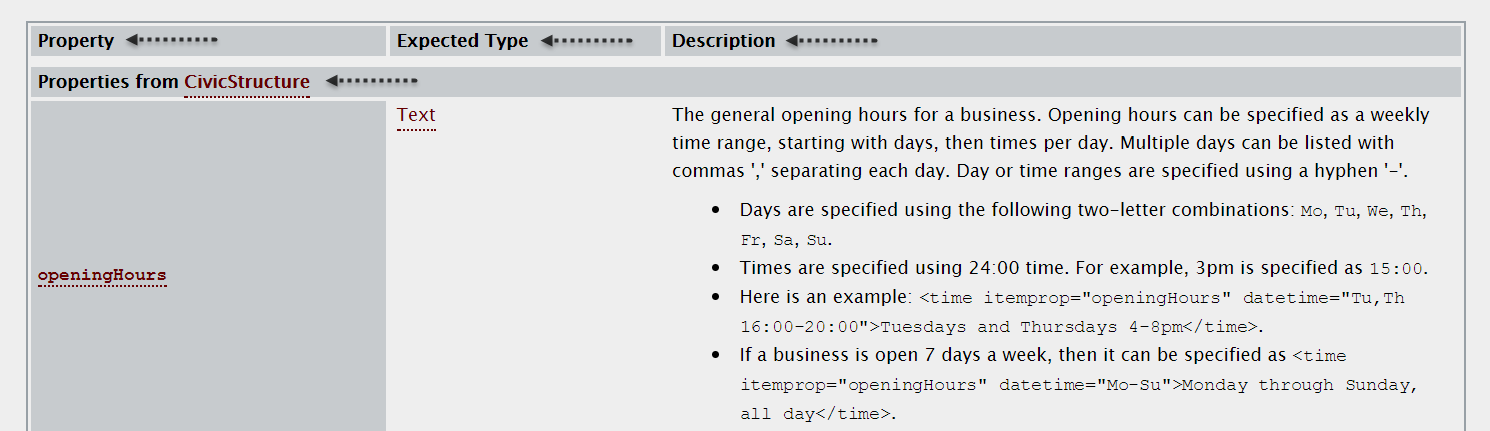
One of the things you may have noticed: under “Property” it says “Properties from CivicStructure.” We know that an Aquarium is a child of CivicStructure, as it is listed above. If we scan the page, we see the following “Properties from…”:
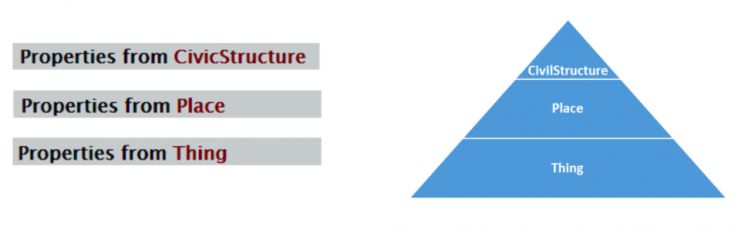
This looks strikingly like the hierarchy listed above and it is (just vertical… and backward). Only one thing is missing – where are the “Properties from Aquarium”?
The answer is actually quite simple — Aquarium has no item properties of its own. Therefore, CivilStructures (being the next most specific item type with properties) is listed first.
Structuring this information with more specific properties at the top makes a ton of sense intuitively. When marking up information, we are typically interested in the most specific item properties, ones that are closest conceptually to the thing we’re marking up. These properties are generally the most relevant.
Creating a markup
- Open the Schema.org item type page.
- In this case, we’ll go to http://schema.org/Aquarium.
- Review all item properties and select all relevant attributes.
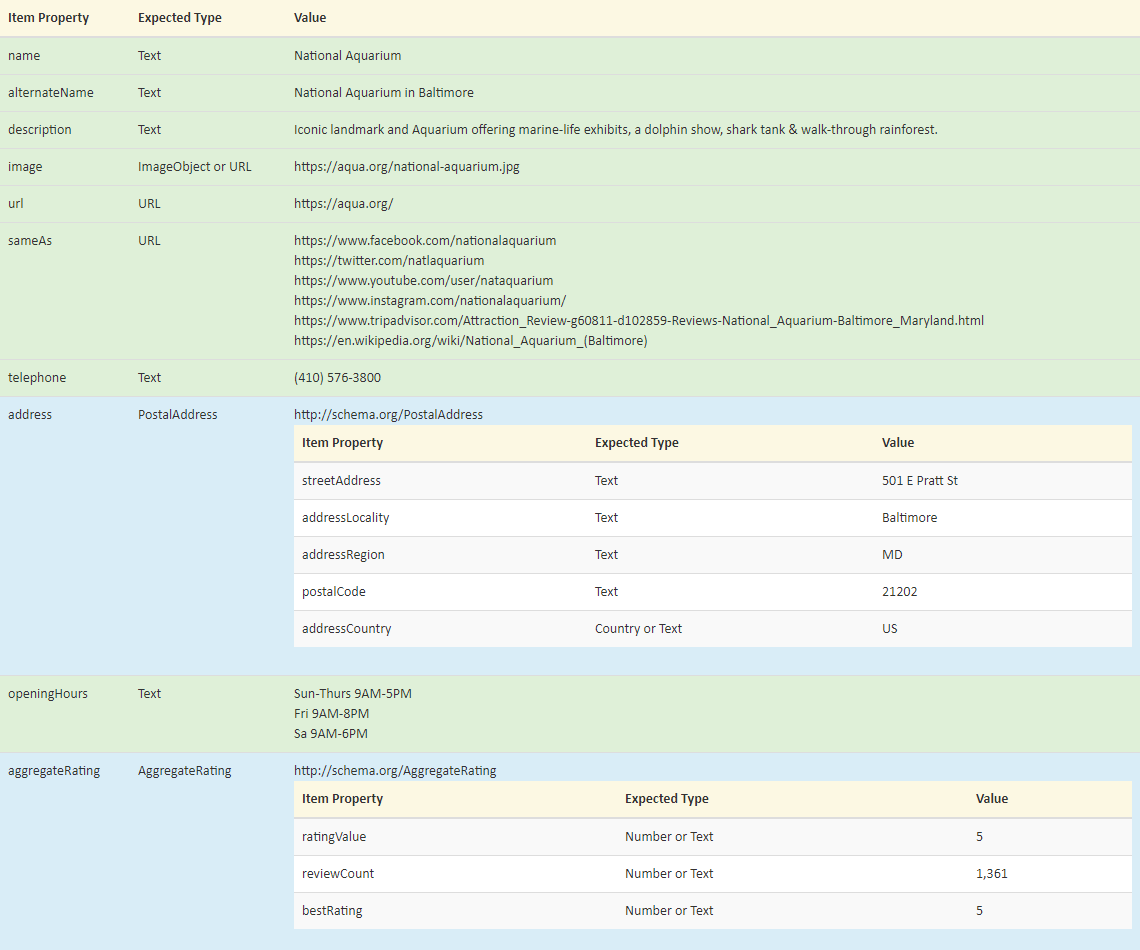
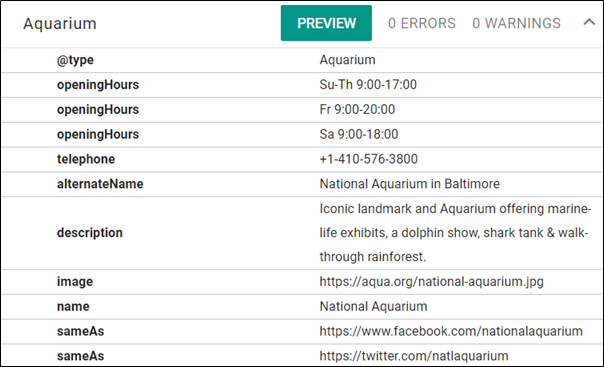
- After looking at the documentation, openingHours, address, aggregateRating, telephone, alternateName, description, image, name, and sameAs (social media linking item property) stood out as the most cogent and useful for aquarium goers. In an effort to map out all of the information, I added the “Expected Type” (which will be important in the next step) and the value of the information we’re going to markup.
Add the starting elements of all markup.
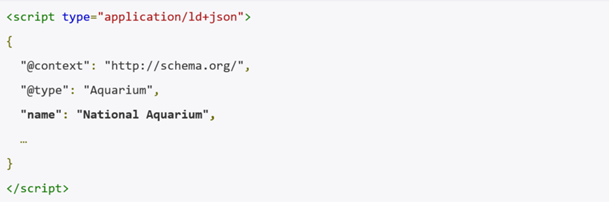
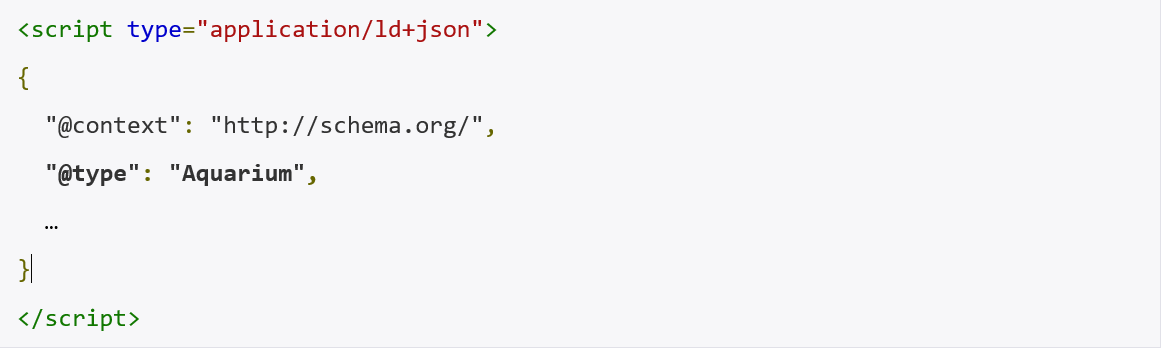
- All markup, whether JSON-LD or microdata, starts with the same set of code/markup. One can memorize this code or leverage examples and copy/paste.
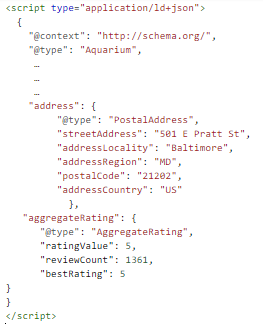
- JSON-LD: Add the script tag with the JSON-LD type, along with the @context, and @type with the item type included:
Start light. Add the easier item properties (i.e., the ones that don’t require nesting).
- First off, how do you tell whether or not the property nests?
- This is where the “Expected Type” column comes into play.
- If the “Expected Type” is “Text”, “URL”, or “Number” — you don’t need to nest.
- I’ve highlighted the item properties that do not require nesting above in green. We’ll start by adding these to our markup.
- JSON-LD: Contains the item property in quotation marks, along with the value (text and URLs are always in quotation marks). If there are multiple values, they’re listed as arrays within square [brackets].
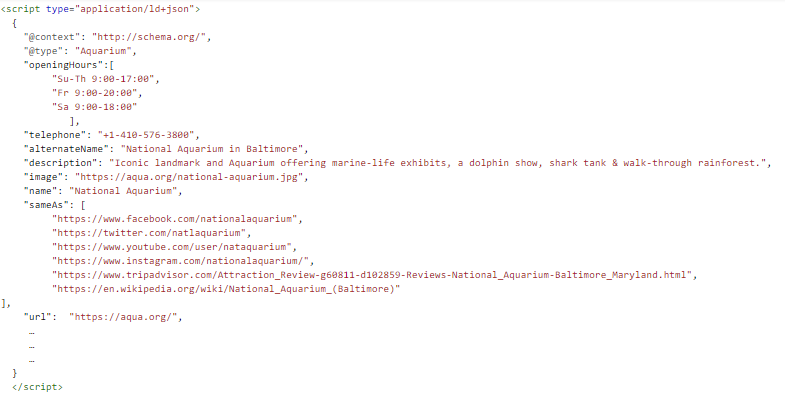
Finish strong. Add the nested item properties.
- Nested item properties are item types within item types. Through nesting, we can access the properties of the nested item type.
- JSON-LD: Nested item properties start off like normal item properties; however, things get weird after the colon. A curly brace opens up a new world. We start by declaring a new item type and thus, inside these curly braces all item properties now belong to the new item type. Note how commas are not included after the last property.
 Test in Google’s Structured Data Testing Tool.
- Looks like we’re all good to go, with no errors and no warnings.
Side notes:
- *address: Google’s documentation list address, nested within PostAddress as a requirement. This is a good indicator of why it’s important to review Google’s documentation.
- openingHours: Multiple times are listed out in an array (as indicated by the square brackets). As the documentation’s “Description section” mentions – using a hyphen for ranges and military time.
- Note: Google’s documentation uses the openingHoursSpecification item property, which nests OpeningHoursSpecification. This is a good example where Google documentation shows a more specific experience to consider.
- telephone: Sometimes you need to add a country code (+1) for phone numbers.
- image: URLs must be absolute (i.e., protocol and domain name included).
TL;DR:
- Schema.org’s documentation can be leveraged to supplement Google’s structured data documentation
- The “Expected Type” on Schema.org tells you when you need to nest an item type
- Check out Merkle’s Structured Data Markup Generator if you want to try simply inserting values and getting a preliminary markup
Thanks!
A huge thanks to Max Prin (@maxxeight), Adam Audette (@audette), and the @MerkleCRM team for reviewing this article. Plus, shout outs to Max (again), Steve Valenza (#TwitterlessSteve), and Eric Hammond (@elhammond) for their work, ideas, and thought leadership that went into the Schema Generator Tool!
Sign up for The Moz Top 10, a semimonthly mailer updating you on the top ten hottest pieces of SEO news, tips, and rad links uncovered by the Moz team. Think of it as your exclusive digest of stuff you don’t have time to hunt down but want to read!
![]()